
 Note: This article originally appeared on an art blog I had with three other women, Check This Art. Since we discontinued the blog, I thought I would repost a revised version here for those of you that are interested in this project. It’s not a recycled project, but an art form I played around with for a few pieces. I’m a bit clumsy and ended up cutting myself one too many times, so I moved on to something less dangerous.
This embossed copper foil art project is really easy to do, pretty inexpensive compared to other art projects, and makes for an interesting and original piece to hang on your walls. So, if you are looking for something to do in a day, give this a shot.

Here’s what you’ll need:
•A roll or piece of copper or silver foil found at your local art and crafts store or on Amazon.
•Tracing paper I found at a fabric store.
•A large piece of foam core.
•Embossing tools. I used a couple different wood sculpting items used for sculpting clay.
•Something pointed and sharp, like a pen.
•A hammer
•Maid-O-Metal Plastic Luster
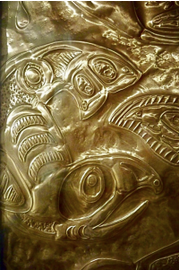
•Sketch out your design. I was inspired by my trip to Alaska and all the Native American art. I created my own interpretation of their animal artwork. Since the full sheet of metal is an odd size, I had to use several pieces of paper to create the design. The metal is pretty thin, so if you like, cut it down to a more manageable size.
•Trace over your designs onto the tracing paper. I like the fabric tracing paper because it comes in colors, which makes it easier to see.
•Place your tracing paper on the metal and trace your design from the paper. It doesn’t seem to stick very well, but at least you’ll have a guideline to work from. Keep in mind when you lay this out, you’ll be working in reverse because you’ll want most of the image to extrude. I traced the image on what I considered to be the back of the foil.
Now the fun part:
•Place the foil on the foam core. You need something soft under the metal, so that when you press on it, the metal will have some give.
•Start by using something sharp to trace an outline each piece.
•Next, press into the metal with the wooden tools. I flipped the metal over so some parts were concaved and other convexed. This took some thought as I went along, especially when it came to the eyes.
•When I was done, I thought the background needed some texture. So, I took a hammer and lightly pounded it.
•Once you are finished, brush a light layer of the Plastic Luster to keep it from dulling.
That’s it! Easy to do in a day.